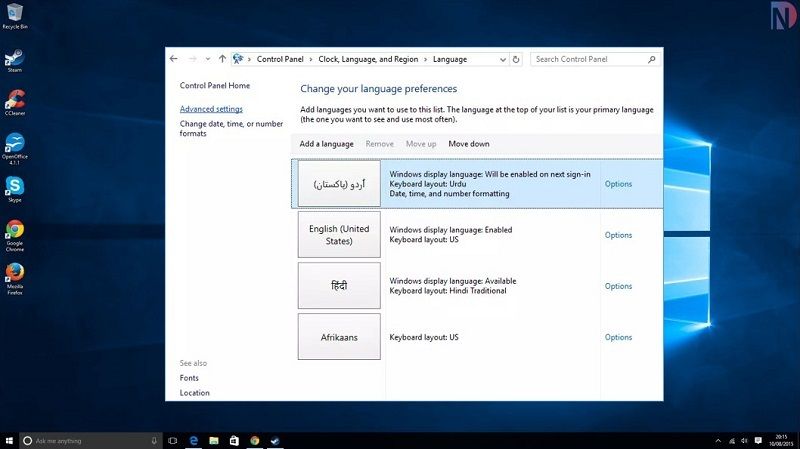
Have incorrect language set up on your Windows 10 (or any other Windows version)?? You are most welcome here in this blog… Here I will be showing you the steps on how to change the system language in Windows 10… without re-installation of-course.
Usually on Windows 10, you choose the default language for the device, during the set up procedure. Nonetheless, if due to like any reason, you selected wrong language settings… or you’re using a pre-configured device… you need to change your Windows language.
Well, this might sound tricky once… however that’s not the truth at all. Actually its quite easy. You can like very easily and yes quickly too change system language windows 10, without having to reinstall it from scratch.
How To Change System Language in Windows 10
Step 1: First press Window key + I onto the keyboard, to open up the settings window.
Step 2: Click Time and Language
Step 3: Click Region and Language
Step 4: Click Add a Language
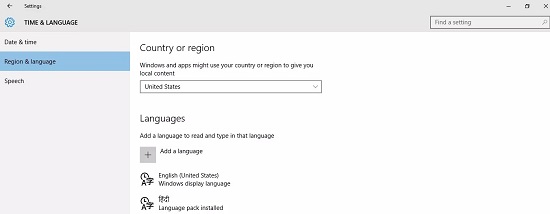
Step 5: Select your desired language and its variation (in case if applicable), by clicking on the language name
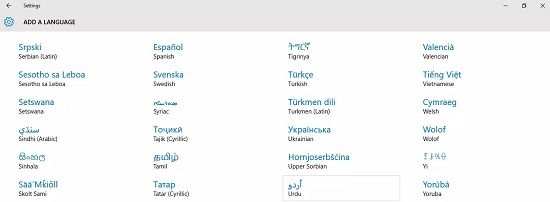
Step 6: Make selection of the new language and then click Options
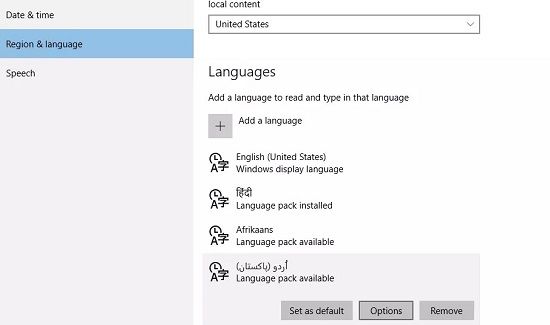
Download Windows 10 Language Pack & Install it
Step 7: Download the entire language pack
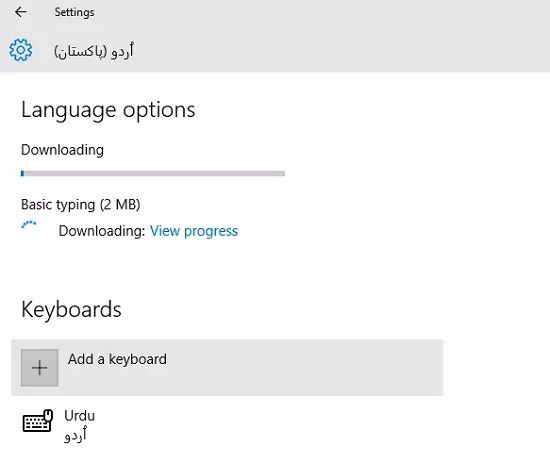
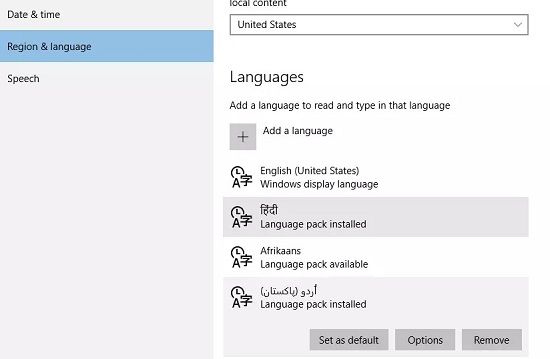
Step 8: Select the new language and then click Set as Default
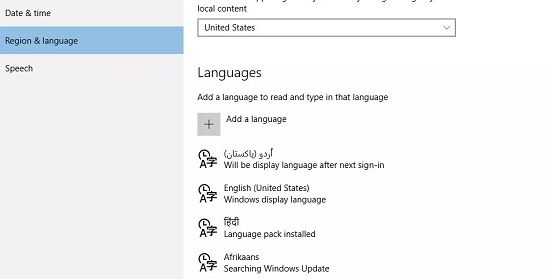
Step 9: You will get your new language displayed, after the next sign-in.
Step 10: Now press Windows key + X from the keyboard. Afterwards, scroll the power menu and then click Control Panel
Step 11: Click Add a Language
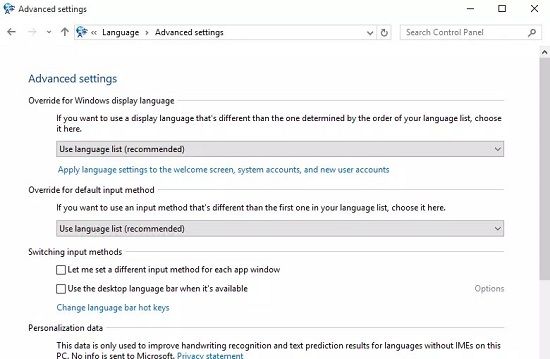
Step 12: Click Advanced Settings in left pane
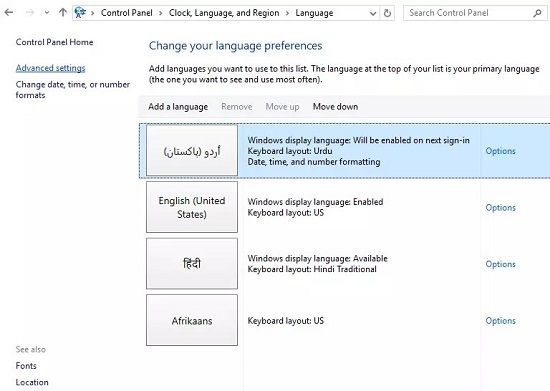
Step 13: Furthermore, click “Apply language settings to the Welcome screen, system accounts, and new user accounts.”.
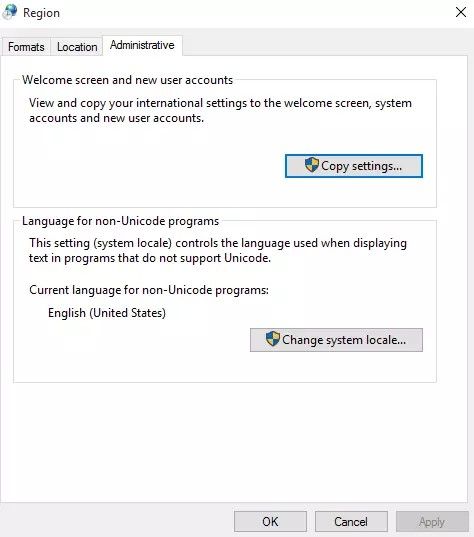
Step 14: Open up Administrative tab and then click Copy settings
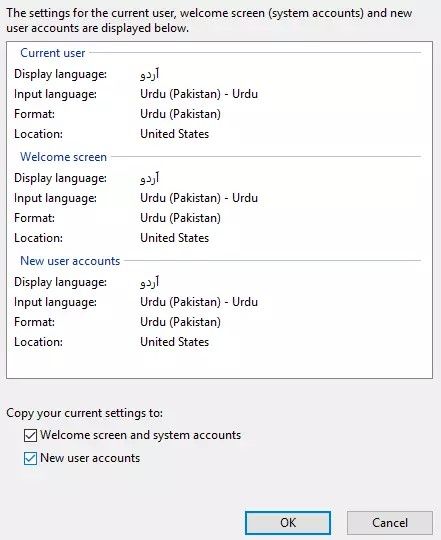
Step 15: Check out both “Welcome screen and system accounts” & “New user accounts” options. Now click OK.
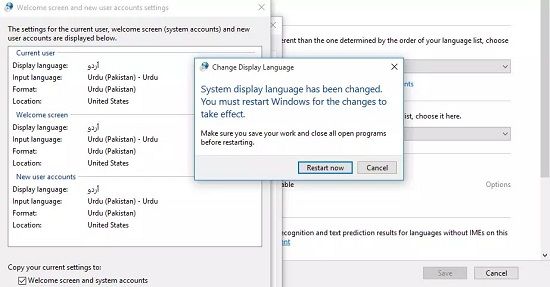
Step 16: Click Restart Now. Afterwards let your system reboot. This would enable it to take effect.
Now finally, after the successful reboot, you will find everything displayed in new language… (your desired language)
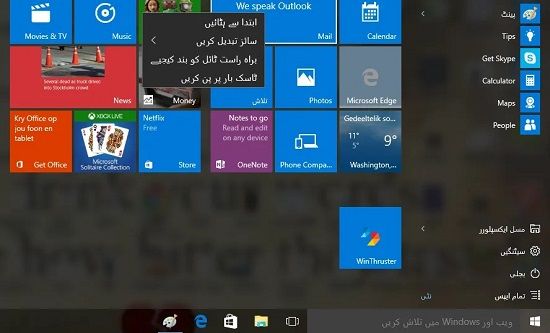
OK… so this was about how to change the system language in Windows 10.
The steps would surely let you know how to fix – Windows 10 display language not changing or can’t change windows display language issue. The guideline is effective for those also, who are looking for how to change language in windows 10 shortcut.
Now have a glance of procedure of adding a new keyboard in Windows 10.
Well this is simple… Only follow the steps I mentioned below… but yes in the sequences I stated…
How to Add a New Keyboard in Windows 10 [Change Keyboard Language Windows 10]
Whenever you add up a new language to Windows 10, it do adds a standard keyboard for that particular language too. So, if you wish to add that another keyboard, just go back to Settings > Time & Language > Language
Now select the language you wishes to add a new keyboard for… followed by the options.
On the resulting screen, click Add a Keyboard under keyboards. Next, choose a keyboard from the list, in order to add it as an input method for that particular language.
Nonetheless, when you do have more than one input method for your computer system… you’ll see the current keyboard displayed onto the right side of the Taskbar, right next to the date and time. Here, click this or you can press Win + Space, in order to change between your input methods easily & quickly.
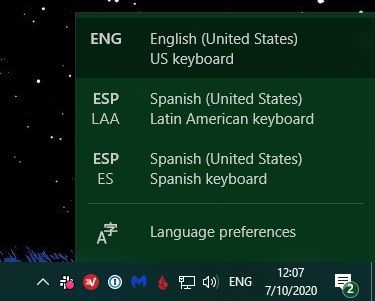
So, this was about how to change keyboard language windows 10.
How to Change Regional Settings in Windows 10
While changing system language in Windows 10, you might prefer changing regional options… like the first day of the week and the date/time format.
To adjust those, head to Settings > Time & Language > Region
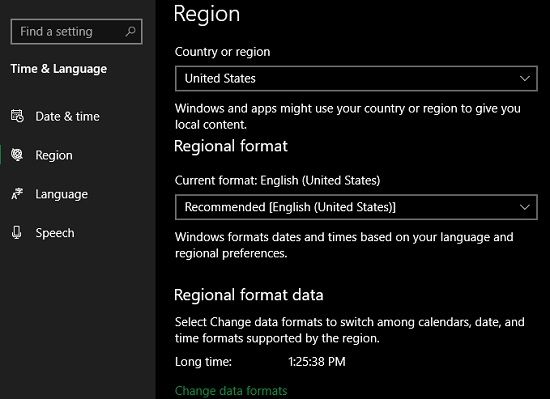
Furthermore, you can change Country or region box to your new location.
Remember, this might change local content which you see across Windows and apps.
In order to change to the advised formatting to a particular region’s standards, change the Regional format box.
In order to instead tweak individual data types, click Change data formats, available at the bottom of the page.
Now, hopefully you guys are clear on things on how to change system language in Windows PC, especially in Windows 10.
Remember, the steps mentioned above are answer to all queries like:
- How to Change Language in Windows 10 from Arabic to English
- How to Change Windows Language from Chinese to English
- or, Steps to windows 10 change language from Chinese to English
How to Change Language in Windows 8?
Here steps are discussed on how to change display language in Windows 8. Steps are easy… can get carried out by even novice PC users…
Open up the language pane…
In order to do this, you’re require to follow the below steps:
- Firstly, open the Charms bar from the desktop
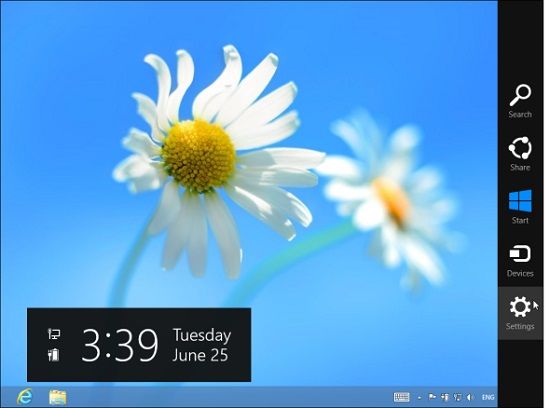
To bring up the Charms bar, you can either press Windows key + C to open it up (swipe from the right on a touchsreen)… or you can move your mouse to the top right or bottom right corner of your screen. Now move it upwards.
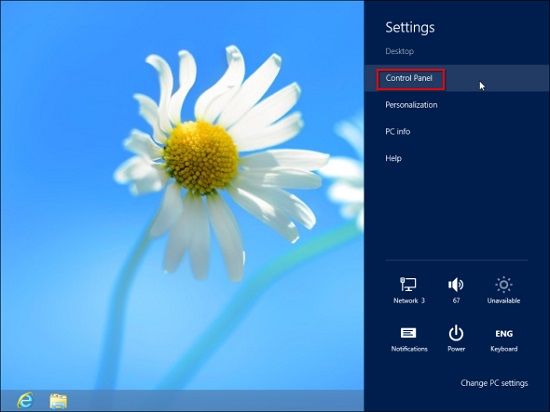
- Click the Settings option in the charms bar and then click the Control Panel It’s the first option you can click at the top of the screen.
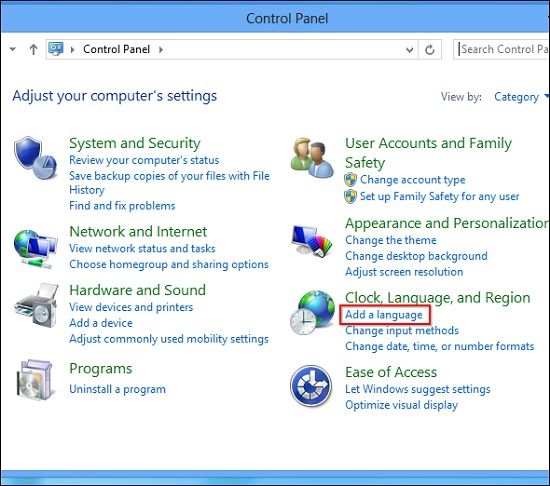
- Click Add a Language option under Clock, Language, and Region.
Note: if the interface is in some other language… look for the icon containing a globe with a clock in front of it. Now click the first option in the list under heading
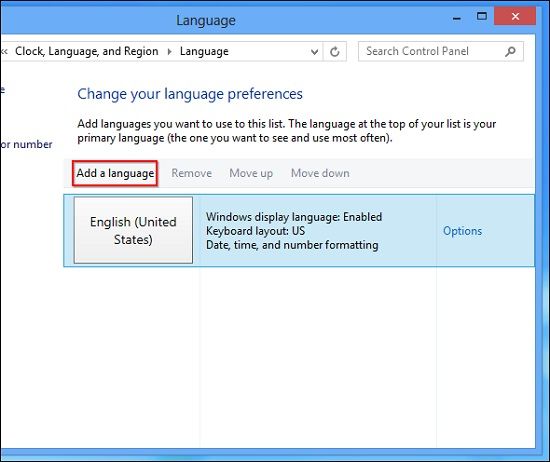
Add a New Display Language
- In case if you don’t see the language you wishes to use in the list… click Add a language option… its their at the top-left corner of the language list.
Note: If your system already comprise language you wishes to add… you can skip the next few steps…
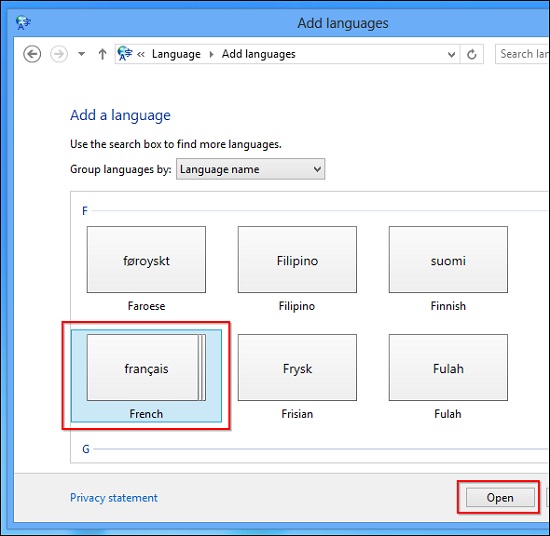
- Make selection of the language you wishes to install from the list and then click the open Moreover, you can also use the search box, present at the top-right corner of the window, in order to search for the languages in the list.
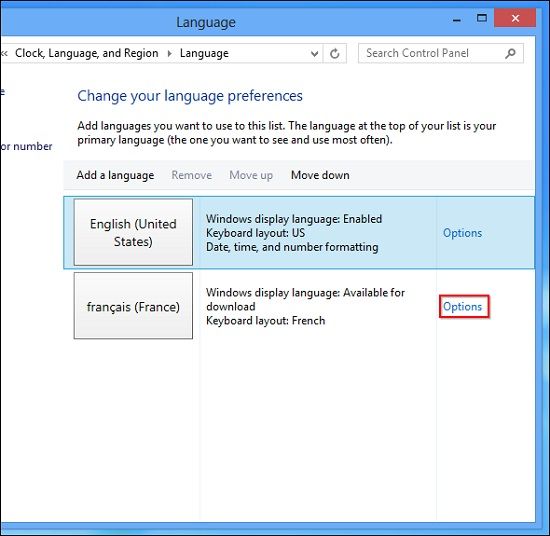
- The language added, now you will find appearing in the list. Use it as an input language… Yes, but in order to use it as an input language… you need to download it. You will find Option link right next to the language you wishes to use… click that link.
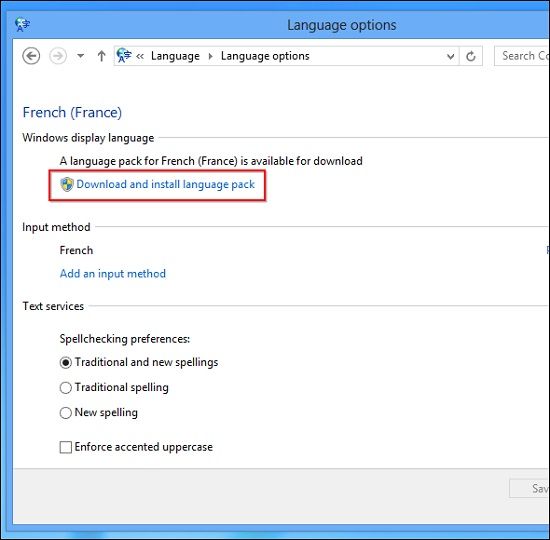
- Click the Download and install Language Pack link in order to download the language pack from Microsoft. Now install it into your respective computer system.
Note: It’s a link with a shield icon, right next to it… This is actually because installing a new language do requires administrative privileges.
- A progress bar will get appear, while Windows downloading and installing the language pack. After the completion of the process… you might be prompted to restart your computer system. After your computer system restarts… log in and then re-open the Language pane after doing so.,..
Set Your Display Language
- Select the language you wishes to use and then click Move Up button… third from the left – this will move it to the top of the list. This will make it your highest-priority language. Keep noted, as long as the appropriate display language support is installed… you can use it as your display language
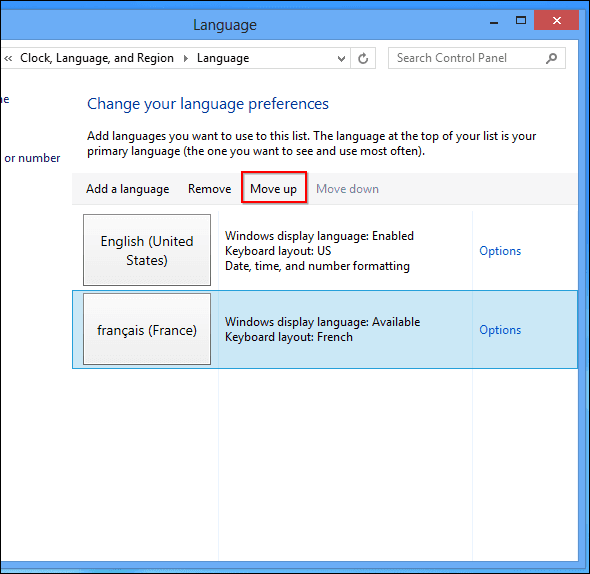
Nonetheless, your system language won’t modify instantly. You’ll be require to log out of Windows and then log back in, for your change to take effect.
- Log back in and you will find your Windows using your new display language. In order to change your language again… go back to the Language pane, drag up a different language to the top of the list and then log out and get log back in.
So, here ends up can’t change Windows display language in Windows 8.
How To Change System Language in Windows 7
Windows 7 allows you to change the display language yourself. You can do it easily and quickly. Just follow the steps mentioned below…
First install the language pack
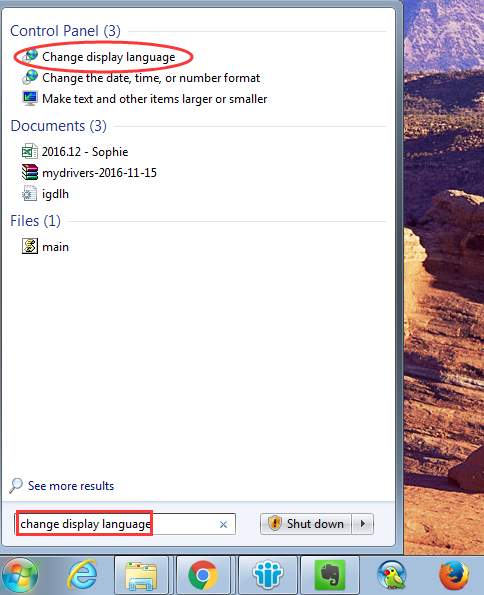
- Click on the Start button, present at the bottom left corner of the desktop
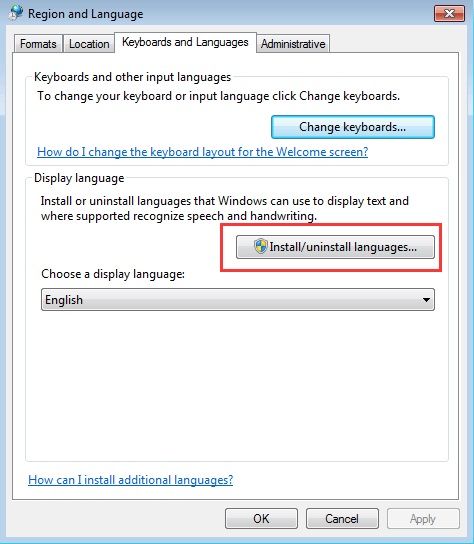
- Type Change display language in the search box. Now select Change Display Language from the result list. Region and Language dialog box will get open.
- Click Install/Uninstall languages option
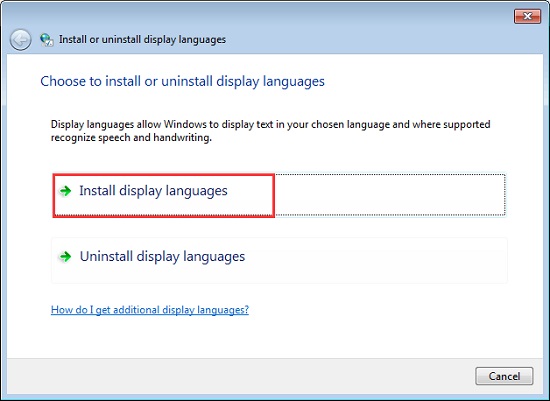
- Select Install Display Languages
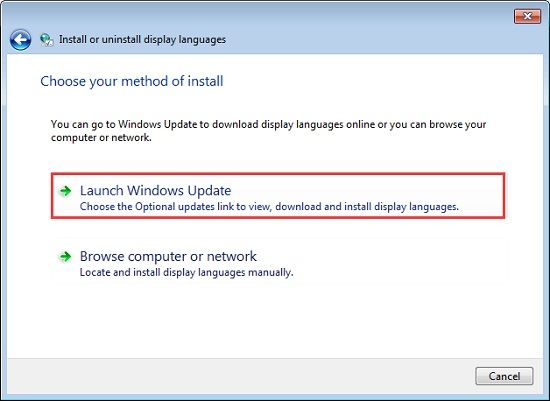
- Select Launch Windows Update
- Click optional updates are available
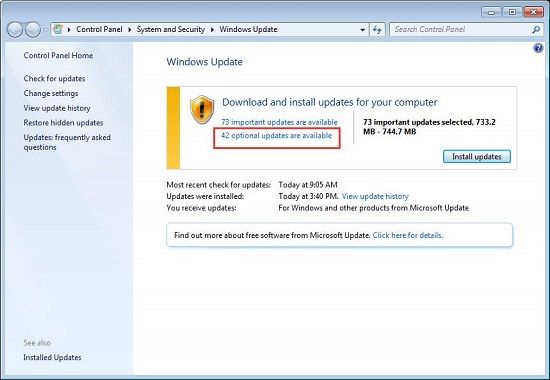
- Under Windows 7 Language Packs, make selection of the language you wishes to install on Windows 7
Note: The vital updates might be selected by default. However, if you do require to install the language pack… just check for the vital updates and ensure they are not selected.
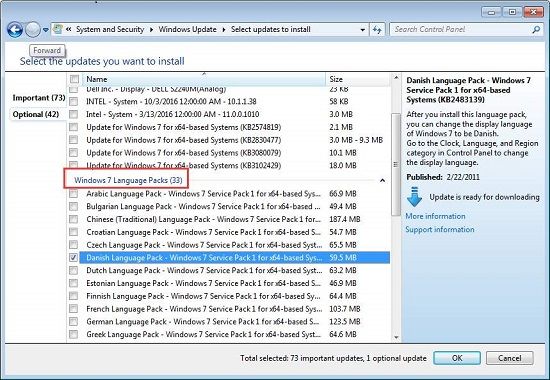
- Click OK button, in order to go back to Windows Update screen.
- Click Install Updates. Now the selected language pack will start downloading and installing
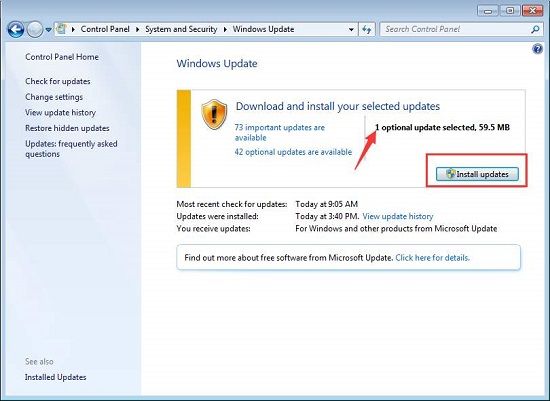
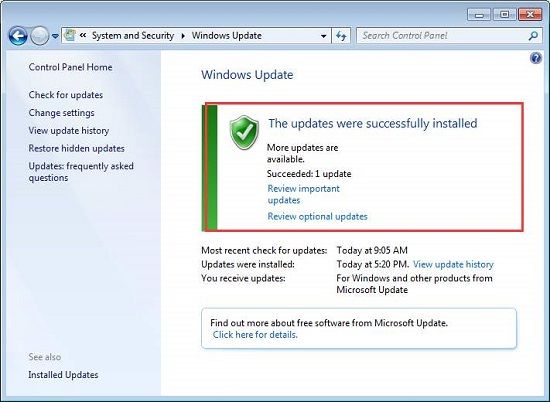
Upon the completion of the updating… you will be furnished with the below shown message:
Change the Display Language in Windows 7
- First click Start button and then click Control Panel on the pop-up menu
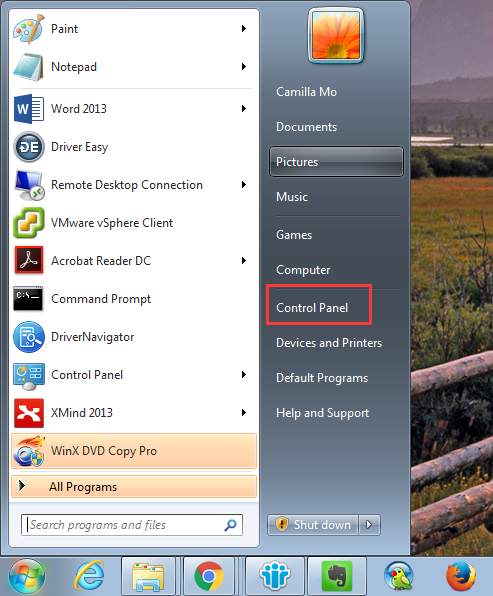
- Now view by category in Control Panel. Under ‘Clock, Language and Region’, click Change Display Language
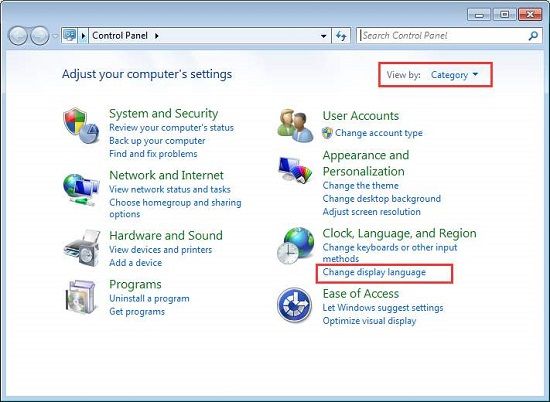
- Choose a Display Language
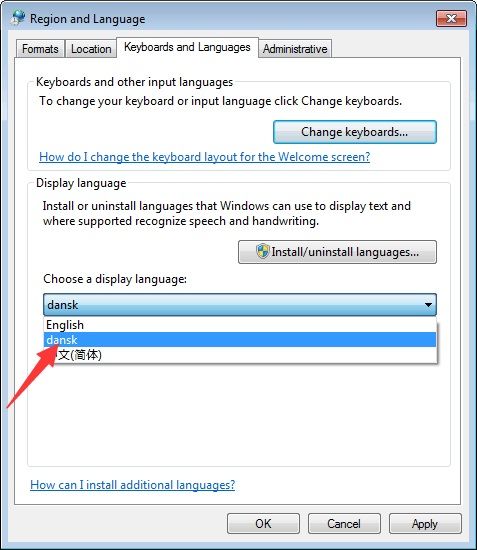
- Click OK
- Restart your computer system… in order to let the changes take effect.
OK… so this was finally ending of blog – How to Change the System Language in Windows 10/8/7 and so on… Hopefully you guys enjoy it reading and it got beneficial for you…
Same sort of blog will be updating in future… so stay tuned with Digital Nishi.
And yes… in case of any queries…. as usual… feel free to discuss it with me in the comment section.
Thanks!!
